

Everything You Need to Know About Dine-A-Chook Chicken Feeders
The Comprehensive Guide to Dine-A-Chook Chicken Feeders
This complete guide covers everything you need to know about Dine-A-Chook Chicken Feeders and answers all of our customers most frequently asked questions.
Use the contents below to jump directly to the section you need, or scroll away!
Table of Contents:
1. Choosing the right Chicken Feeder
2. Installing a Dine-A-Chook Chicken Feeder
3. Using a Dine-A-Chook Chicken Feeder
4. Choosing the right chicken feed for your hens
5. Trouble-shooting Dine-A-Chook Feeders
1. Choosing the right Chicken Feeder for your coop
Don’t waste money on cheap chicken feeders that make your life difficult. When we first got chickens many years ago, the spilled and wasted feed quickly got us thinking that chickens were too much work. But they don’t have to be!
Keeping chickens is easy, with the right equipment. Dine-A-Chook Feeders were the solution to the problems we had in our own chicken coop: feed that got wet in the rain plus spillage that attracted rodents and other pests. All of that wasted feed was costing us money, not to mention the time and frustration of constantly cleaning the coop.
By keeping feed dry and in the feeder, our Feeders make chicken keeping easier. All you have to do is refill the Feeder as needed!
FAQ: What size Chicken Feeder do I need?
Dine-A-Chook Chicken Feeders come in two sizes:
- Small Feeder (Capacity: 6-7 lb; Height: 21.06 inches)
- Large Feeder (Capacity: 8.15 lb; Height: 28 inches)
The Small Chicken Feeder was designed for areas with a height restriction, such as chicken tractors and small coops. If you cannot walk into your chicken coop, you probably need a Small Feeder.
Our Large Chicken Feeder holds approximately 2 pounds more food than the smaller feeder and we recommend it wherever height is not a restriction.
FAQ: How many Chicken Feeders do I need?
One to two birds can use a Dine-A-Chook Feeder at any one time but chickens usually take turns to eat. We recommend one Feeder for every 6-8 birds to ensure more dominant birds do not monopolise the feed.
If you do not want to refill your Feeder as often, for example if you plan to go away on weekends, you may need additional Feeders.
On average, our Small Feeder will comfortably feed 4 chickens for 4 days and our Large Feeder will feed 6 chickens for 4 days. Feed consumption varies depending on breed, diet, habit etc. so it is important to monitor the behaviour of your own flock.
FAQ: Can I use a Dine-A-Chook Feeder for other poultry?
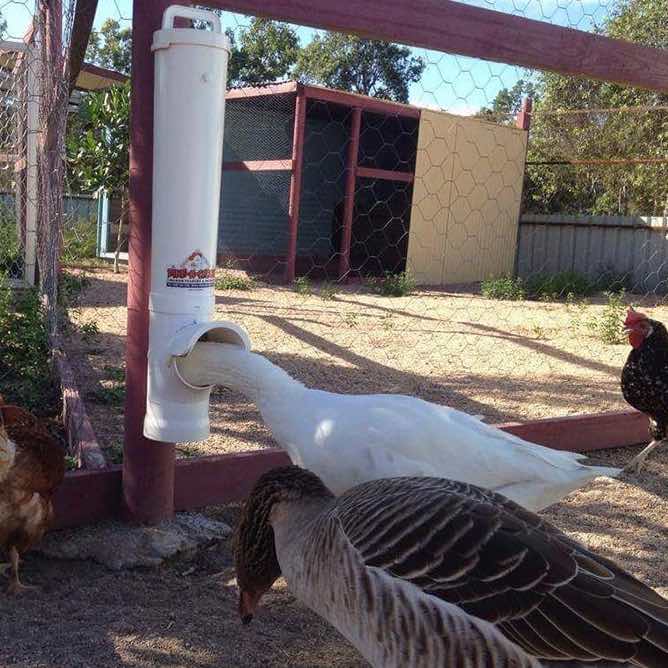
Dine-A-Chook Chicken Feeders are suitable for many types of backyard poultry, waterfowl and game birds. Simply adjust the mounting height to suit!
Our happy customers recommend using Dine-A-Chook Chicken Feeders for:
- Chickens (bantams, roosters, all of them!)
- Ducks
- Geese
- Turkey
- Guinea fowl
- Pheasants
The Billabong Sanctuary in Townsville, Australia, even uses a Dine-A-Chook Feeder for the emus!
FAQ: I have rats in my chicken coop. Can I use a Dine-A-Chook Chicken Feeder?
You can use a Dine-A-Chook Feeder if you have rats in your coop. But nothing is 100 % rat-proof. We recommend removing the Feeder overnight until you have dealt with your rodent problem.
The only way to get rid of rats in the chicken coop is through a baiting or trapping program.
It doesn't matter what the marketing says, no chicken feeder is going to get rid of rats if they are already there. In fact, once rats discover food in the chicken coop, they are unlikely to be deterred by a different Feeder. They quickly learn to open so-called “rat-proof” treadle feeders and can even chew through brick and metal.
Deal with rats by baiting or trapping. Do your best to make the chicken coop rodent-proof. And invest in a waste-reducing Dine-A-Chook Feeder. By keeping feed off the floor, our Feeder removes the main attractant for rodents in the chicken coop.
FAQ: Do Dine-A-Chook Feeders leak?
Dine-A-Chook’s patented snap-together design has no screws or joins to leak. The built-in rainhood and gutter system keeps the feeding bay dry.
Extensively tested in tropical Australia, we know our Feeders keep feed dry, preventing waste.
FAQ: How long do Dine-A-Chook Feeders last?
Dine-A-Chook Feeders are built to last. With a little care, they can last for 10 years or more. We know, because we still see our original model Feeders in use!
FAQ: Do Dine-A-Chook Feeders leach chemicals?
Dine-A-Chook Feeders are made of industrial-standard ASA thermoplastic. They are designed for long-term outdoor use and won’t degrade in the sun like other plastics. They are lead- and BPA-free.
FAQ: Where are Dine-A-Chook Feeders made?
Dine-A-Chook is Australia's leading manufacturer of Chicken Feeders (and Drinkers)! All of our Feeders are manufactured in Brisbane and hand assembled by our team before being sent to our California warehouse for shipping throughout the USA.
When you choose a Dine-A-Chook Chicken Feeder, you are choosing an Australian-made product that you can trust and supporting a family-owned Australian business.
2. Installing your Dine-A-Chook Feeder
FAQ: Where should I put my Dine-A-Chook Feeder? Can it go outside?
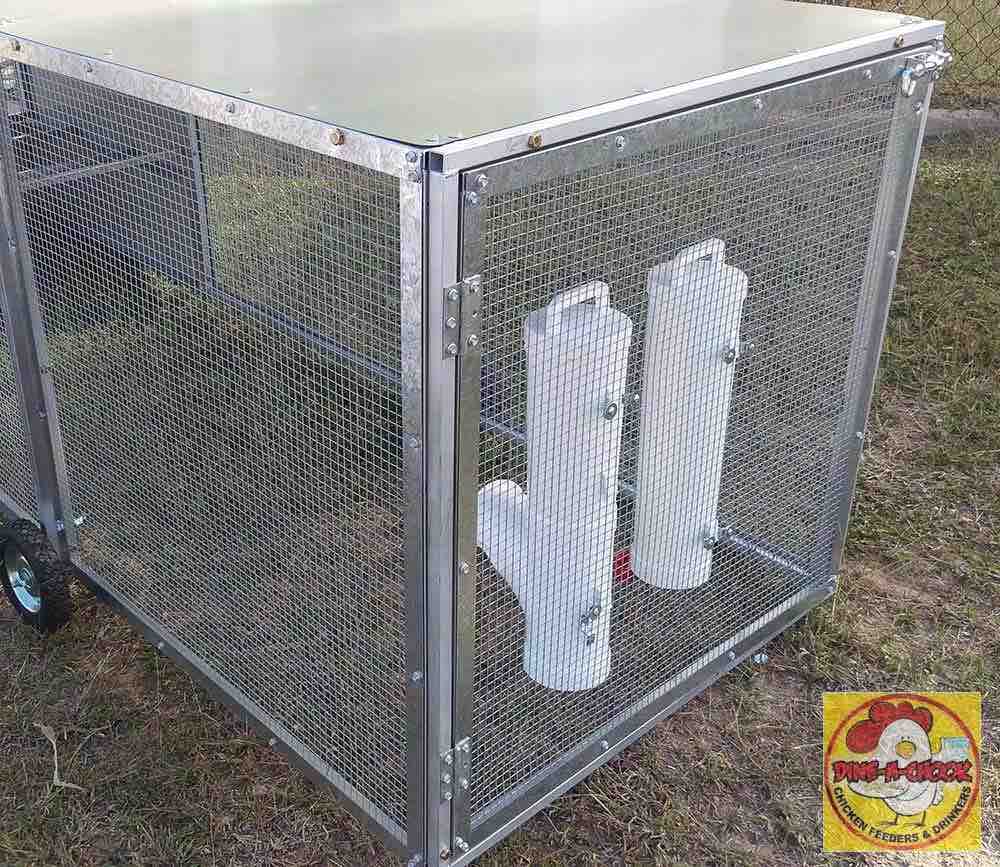
Dine-A-Chook Feeders can be installed outside but should always be in the shade to prevent feed becoming warm and spoiling.
Our Feeders are made of UV treated ASA, so they won’t become brittle or break if exposed to sunlight. They are also watertight and protect the feed from becoming wet in the rain.
Our Feeders can be damaged by livestock and may be more at risk of use by pest animals, e.g. rodents, wild birds, if installed outside of the chicken coop.
FAQ: How high off the ground should my Feeder be?
Dine-A-Chook Feeders are designed to be mounted so that the feeding bay is at “chicken height”. This means at roughly the height of the back of the bird’s neck, about 4-6 inches off the floor.
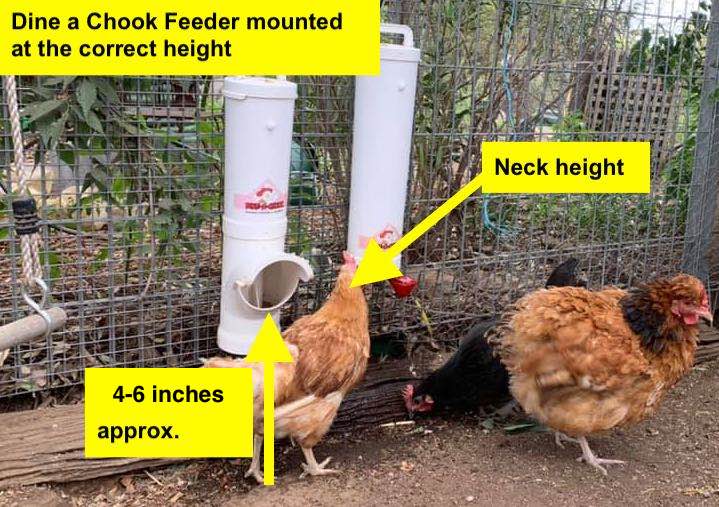
Mounting your Feeder at the correct height is important for the waste-reducing and pest-deterrent features to work correctly, as well as for your birds to eat comfortably.
Chicken Feeders should always be mounted to suit your smallest bird and the appropriate mounting height will vary depending on the breed. In mixed flocks, you may need two Feeders mounted at different heights.
You can also provide a step for chickens, such as a paver or block, as in the image below. Mounting the Feeder higher and providing a removable step can make feed less accessible to rodents and pest birds.Always monitor your flock after installing a new Feeder to ensure all birds can comfortably access the feed.

FAQ: How do I install my Chicken Feeder?
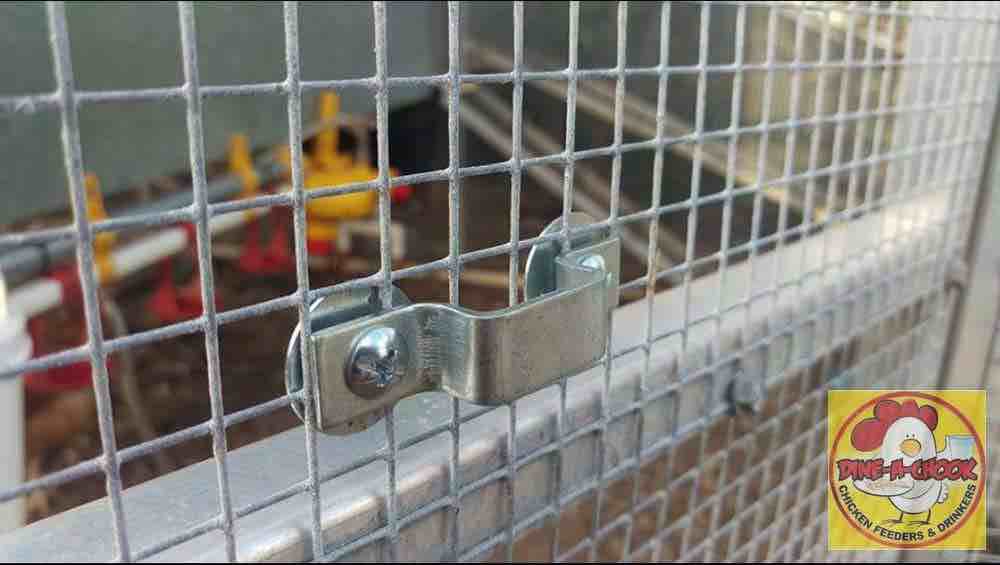
Dine-A-Chook Feeders must be installed using the custom-made steel brackets provided in the complementary Mounting Kit. Although our Feeders have 3 rear mounting hooks, they should be mounted using the top and bottom hooks.
Our Manufacturer's Warranty only covers rear mounting hook damage where the Feeder has been installed using the mounting brackets provided.
For installation on wire mesh, we recommend using bolts and washers to mount the Feeder. Our Warranty does not cover rear mounting hook damage where the Feeder is hung directly on wire mesh without the use of the mounting brackets.
FAQ: How to install a Dine-A-Chook Feeder on a solid surface, e.g. timber or metal
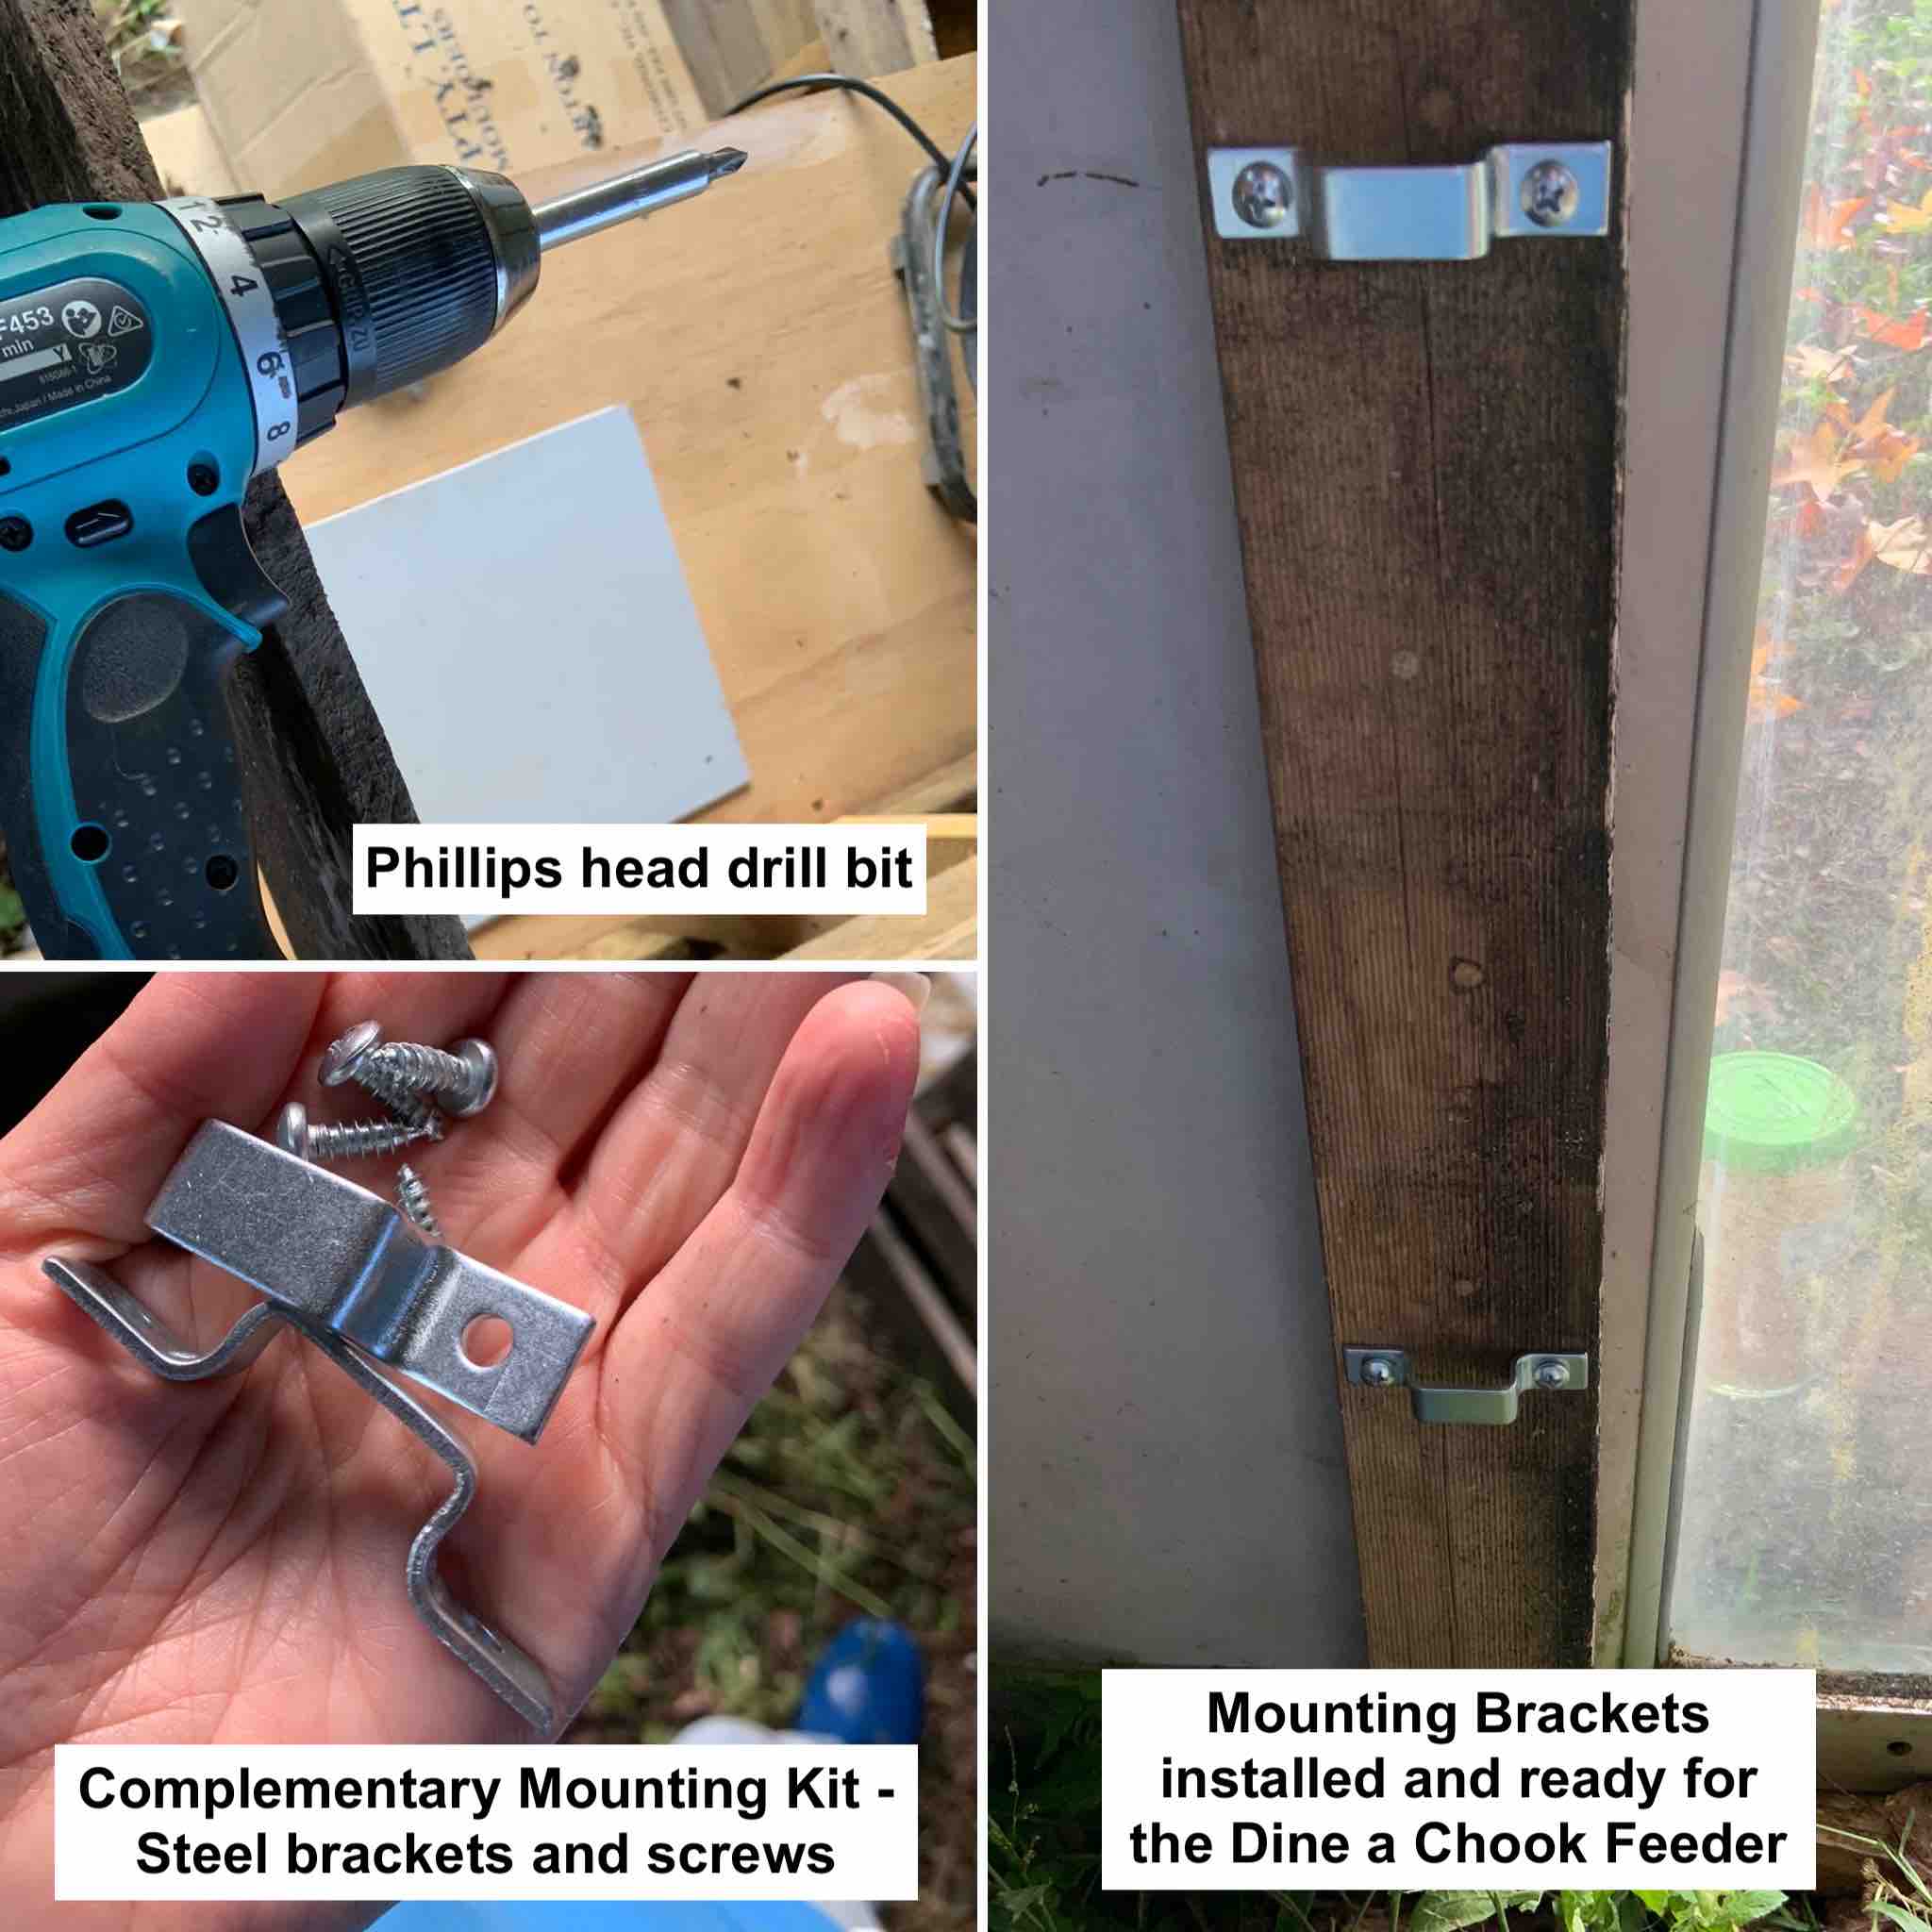
All Dine-A-Chook Feeders come with a complementary Mounting Kit for easy installation.
To install your Feeder, you will need:
1 x Complementary Dine-A-Chook Mounting Kit (2 steel brackets + 4 screws)
1 x Drill with a Phillips head bit
For installation on concrete or brick surfaces, alternative screws may be used.
Steps to install a Dine-A-Chook Feeder on timber or metal
- Determine the correct height for the feeding bay (see above)
- Slip a steel bracket onto the top mounting hook
- Hold the Feeder against the mounting surface at the correct height
- Mark the bracket location or simply hold the bracket firmly in place as you remove the Feeder
- Screw the bracket into place
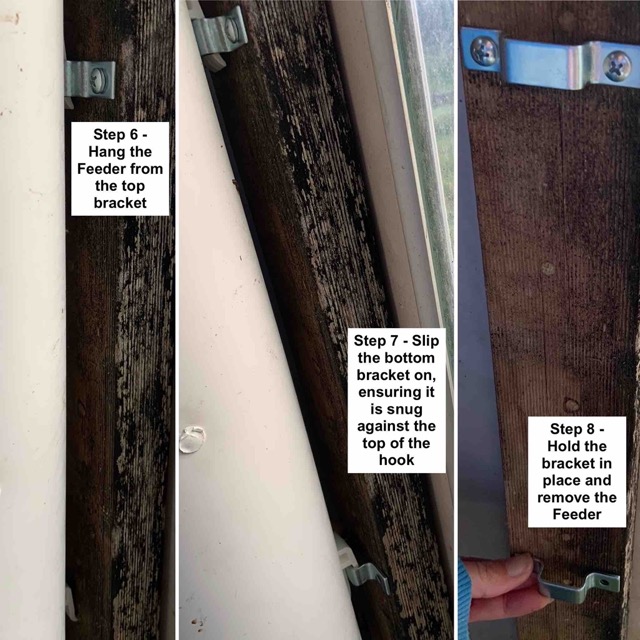
- Hang the Feeder from the top bracket
- Slip the second bracket onto the bottom mounting hook, ensuring it is snug at the top so that weight is distributed equally between both brackets
- Mark the location of the second bracket or hold in place as you remove the Feeder
- Screw the second bracket into place
- Hang your Feeder and check that weight is evenly distributed between the mounting hooks
Always monitor your flock carefully to ensure all birds are able to comfortably reach the feed.
FAQ: How to install a Dine-A-Chook Chicken Feeder on wire mesh
All Dine-A-Chook Feeders come with a complementary Mounting Kit. For wire mesh installation, you will additional hardware as below.To install your Feeder, you will need:
1 x Complementary Dine-A-Chook Mounting Kit (2 steel brackets + 4 screws)
4 x Bolts with nuts
4 x Washers to fit the wire mesh size
You may need pliers and/or a shifter to tighten the nuts. An additional person to help is also handy.
Steps to install a Dine-A-Chook Feeder on wire mesh
- Determine the correct height for the feeding bay (see above)
- Slip a steel bracket onto the top mounting hook
- Hold the Feeder against the wire mesh at the correct height
- Slip a bolt through the bracket and mesh, ensuring it is resting on a horizontal wire
- Slip a washer and nut onto the back of the bolt and tighten loosely
- Repeat on the other side and tighten both sides evenly
- Hang the Feeder from the top bracket
- Slip the second bracket onto the bottom mounting hook, ensuring it is snug at the top so that weight is distributed equally between both brackets
- Slip a bolt through the bracket and mesh, ensuring it is resting on a horizontal wire
- Slip a washer and nut onto the back of the bolt and tighten loosely
- Repeat on the other side and tighten both sides evenly
- Hang your Feeder and check that weight is evenly distributed between the mounting hooks
Always monitor your flock carefully to ensure all birds are able to comfortably reach the feed.
3. Using your Dine-A-Chook Chicken Feeder
FAQ: How do I teach my chickens to use the Feeder?
Most chickens don’t need to be taught how to use a Dine-A-Chook Feeder. They will work it out quickly on their own.
But if you are worried about your chickens or want to encourage them to use the Feeder, you can put a favourite treat into the mouth of the feeding bay. We recommend using something dry like Dried Mealworms or pumpkin seeds.
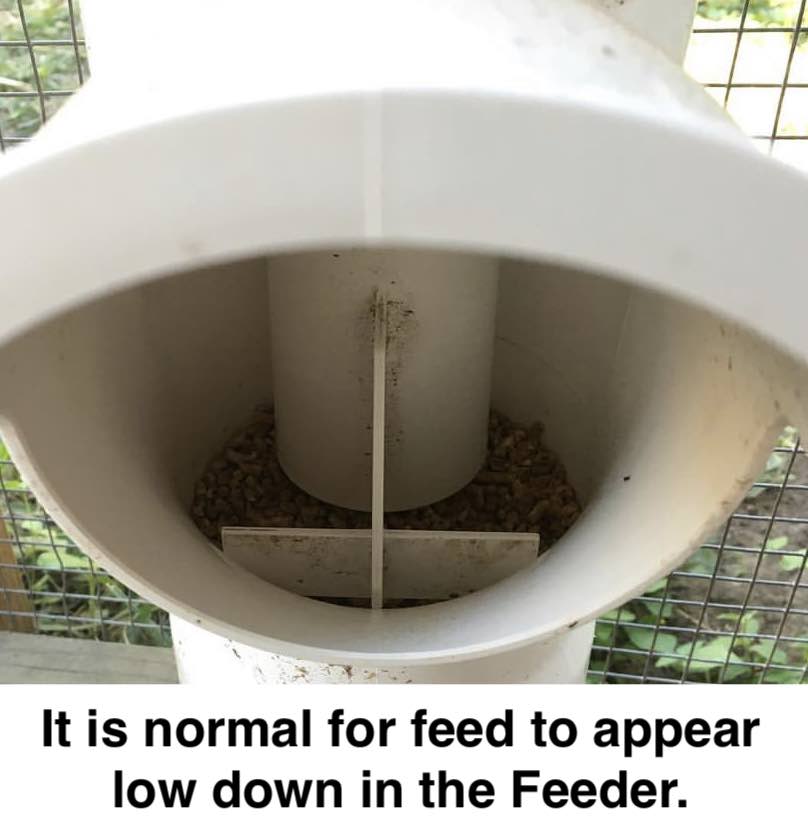
FAQ: How much feed should be in the Feeder?
Dine-A-Chook Chicken Feeders will function perfectly well no matter how little or how much feed is in them.
FAQ: Can more than one chicken use the Feeder?
Yes, you will often see 2 or sometimes even 3 chickens using your Dine-A-Chook Feeder at the same time. This is fine.
Usually we recommend one Feeder for every 6-8 birds to ensure that all members of the flock have ample access to food.
FAQ: How does the Feeder work?
The Feeder works by keeping feed in the feeding bay. Hens must put their entire head in the Feeder to eat, and cannot scratch the feed out thanks to our innovative design. This keeps feed clean and stops waste.

FAQ: How often do I need to fill my Dine-A-Chook Feeder?
The amount of feed consumed by your chickens will determine how often your Feeder needs to be refilled.
As a general guide, our Small Feeder will feed 4 chickens for 4 days, while our Large Feeder will feed 6 chooks for 4 days. However, the amount of feed consumed by your chickens will vary depending on breed, diet, habit etc. so you should check your Feeder regularly until a pattern has been established.
FAQ: How often do I need to clean the Feeder?
We recommend cleaning out the bottom of the feeding bay every few weeks by removing the bottom interior-cap ( see Troubleshooting - Feeding Bay Depth to learn how). Give your Feeder a thorough clean as needed.
FAQ: How do I clean the Dine-A-Chook Feeder?
Dine-A-Chook Feeders shouldn’t develop mould or other problems common with feeders, as long as you use a dry, pelleted feed.
But if you need to clean your Dine-A-Chook Feeder, simply remove the Feeder from the coop and wash in warm soapy water (not hot). Remove the bottom interior-cap to clean the feeding bay thoroughly.
Rinse well and allow to dry completely before reassembling.
4. Choosing the right chicken feed for laying hens
A good diet is one of the most important factors for productive and healthy hens. Many of the problems we see in our customers’ flocks are caused by a poor diet. Follow our simple advice for happier, healthier chooks that lay more eggs.
FAQ: What is the best diet for laying hens?
So many customers feed their chickens a scratch grain supplemented with lots of kitchen scraps and garden waste. This seems like a varied diet, but it is actually about the worst possible diet for laying hens.
The best diet for laying hens is unlimited access to a complete layer pellet.
- Choose a high-quality feed with 16-18 % protein
- Always choose a pellet, micro-pellet or crumble
- Limit treats and scraps to no more than 10 % of the diet
- Avoid chicken scratch and other feeds where the ingredients can be identified, except as a treat
- Always provide your chickens with shell grit in a separate dish to their feed
FAQ: What type of feed works best with a Dine-A-Chook Feeder?
The best feed to use with a Dine-A-Chook Feeder is a commercial layer pellet.
A micro-pellet or crumble is also fine.
Scratch and other grain mixes decrease the effectiveness of the waste-reducing features of the Feeder.
Do not use a Dine-A-Chook Feeder for:
- Molasses-coated feed
- Fermented feed
- Sprouted feed (unless dry)
- Other sticky or wet feeds
- Scraps
- Treats
FAQ: What is wrong with chicken scratch?
Scratch grains look good and are often recommended in feed stores. But scratch is actually bad for chickens and causes of a lot of the health issues we see in backyard flocks.
Even a “complete” grain mix won’t do, because chickens will only pick out the ingredients they like, developing deficiencies in the process!
Chicken scratch is fine as a treat, but it should never be chickens’ main feed.
FAQ: Can I still give my chickens treats and scraps?
Scraps and treats are ok for chickens in moderation but the main part of their diet should be their feed.
Never give chickens more scraps or treats then they will eat in 20 minutes and always clean up uneaten food. Avoid highly-processed, sugary, salty or fatty foods, including things like bread and pasta.
Fruit and vegetables are the best scraps for chickens. Forage greens are also healthy, especially for birds that don’t free-range.
For treats, scratch grains, cracked corn, pumpkin seeds, sunflower seeds and other whole grains are healthy options.
FAQ: What happens if my chickens free-range?
Free-ranging is great for chickens. It stops them from getting bored, gives them an opportunity to express natural chicken behaviours and improves their diet with the addition of forage and bugs.
Free-ranging chickens should still have unlimited access to their chicken feed from when they get up in the morning to when they roost at night.
5. Trouble-shooting Dine-A-Chook Chicken Feeders
Dine-A-Chook Feeders are designed to make chicken keeping easier, not harder. But sometimes customers need help with a new Feeder, so we have provided trouble-shooting for some of the most common questions about Dine-A-Chook Chicken Feeders.
FAQ: Why isn’t the feeding bay refilling?
Dine-A-Chook Feeders are designed so that the feeding bay refills automatically as your chickens consume the feed.
If the feeding bay is not automatically refilling, there are a few common causes:
- The feeding bay could be too shallow and be stopping the feed from refilling freely. See below for how to adjust the depth to allow the feed to flow into the feeding bay freely.
- You could be using a sticky feed which has clogged the feeder. Molasses-coated grain mixes are notorious for this.
- Something is blocking the feeding bay inlet. This is usually a sticky feed but could also be a piece of debris. We haven't yet found a commercial feed that is big enough to block the inlet when the feeding bay is at full depth.
- The Feeder is empty.
FAQ: How do I change the feeding bay depth?
The feeding bay depth is easy to change.
The bottom of the Dine-A-Chook Feeder is an interior fitted screw cap. This cap makes it possible to adjust the feeding bay depth (it is also easy to remove for cleaning). Screwing the cap moves it up and down, adjusting the depth of the feeding bay inside.
To adjust the depth of the feeding bay, hold the feeder horizontally with the feeding bay facing up and the lid on. Screw the bottom cap and you will be able to see and feel whether the feeding bay is getting shallower or deeper. Adjust the feeding bay depth as required.
FAQ: When should I change the feeding bay depth?
The feeding bay depth will make a difference to how easily your chickens can access the feed. For smaller hens, a shallower feeding bay may make it easier for them to eat.
Feeding bay depth is also important for ensuring the feeding bay automatically refills with feed from the feed silo. Larger feeds require a larger space between the bottom of the silo and the bottom of the feeding bay, so the feeding bay needs to be deeper or it won’t automatically refill.
FAQ: Some of my hens aren’t eating from the Feeder
Start by watching your hens for an extended period. Just because you don’t see them eating from the Feeder does not mean that they aren’t using it.
Sometimes chickens need a little help to get used to a Dine-A-Chook Feeder. There are some tips for teaching your hens to use the Feeder above.
Feeder height may also be an issue. Can the hen reach the feed? Consider the depth of the feeding bay as well as the mounting height. A small step, such as a paver or brick, could be an easy fix.
Also watch your hens to see if more dominant birds are monopolising the Feeder. This can happen in larger flocks, and even in small flocks sometimes a bully will set herself up to guard the Feeder against lower-ranked hens. In this case, you may need to install a second Feeder in an alternative location.
Do you have a question we haven't answered?
Contact us. If you call during Australian business hours, you'll be able to speak to a real person with backyard chickens of their own.
Happy chicken keeping!
Rachael at Dine-A-Chook